# Create and Manage App Containers
## Overview
{% hint style="info" %}
**Custom Branding**
Please familiarize yourself with the [Custom Branding](https://docs.journeyapps.com/reference/build/app-styling-and-customizations/custom-branding) section first.
{% endhint %}
The process to create a custom-branded container in OXIDE can be outlined as follows:
1. Create a container configuration
1. Here’s where you define all container-level settings
2. Select one or more platforms that should share the configured settings
1. Some platforms have specific settings that also need to be configured (e.g. uploading a provisioning profile for iOS)
2. Optionally enable/disable container-level features
3. Trigger builds for each enabled platform
1. Select a container version
4. Download and/or distribute the containers
Visually, the main components relate as follows:
### Limitations
* Only container versions 23.2.1 or greater are supported in OXIDE. Please contact [JourneyApps support](mailto:support@journeyapps.com) if you require a custom-branded container for a older version.
* Configuring SSO for your app is not currently supported in OXIDE. Please see the [SSO](#sso) section below on details to request SSO.
### What you need to get started
* A high-resolution version of the container icon - see [below](#container-icon) for details.
* A launch screen image - see[ ](https://docs.journeyapps.com/reference/build/app-styling-and-customizations/custom-branding#launch-screen-image)[below](#launch-screen-image) for details
* For iOS only: Apple requires that the iOS container is signed with a valid distribution certificate. See the [Special Requirements for iOS Containers](https://docs.journeyapps.com/reference/build/app-styling-and-customizations/custom-branding/special-requirements-for-ios-containers) section.
#### Container Icon
Please see below for the requirements for the container icon:
* A 1024x1024 pixel icon in PNG format, not exceeding 1MB in size.
* Please note that the app icon should not be transparent nor have an alpha channel

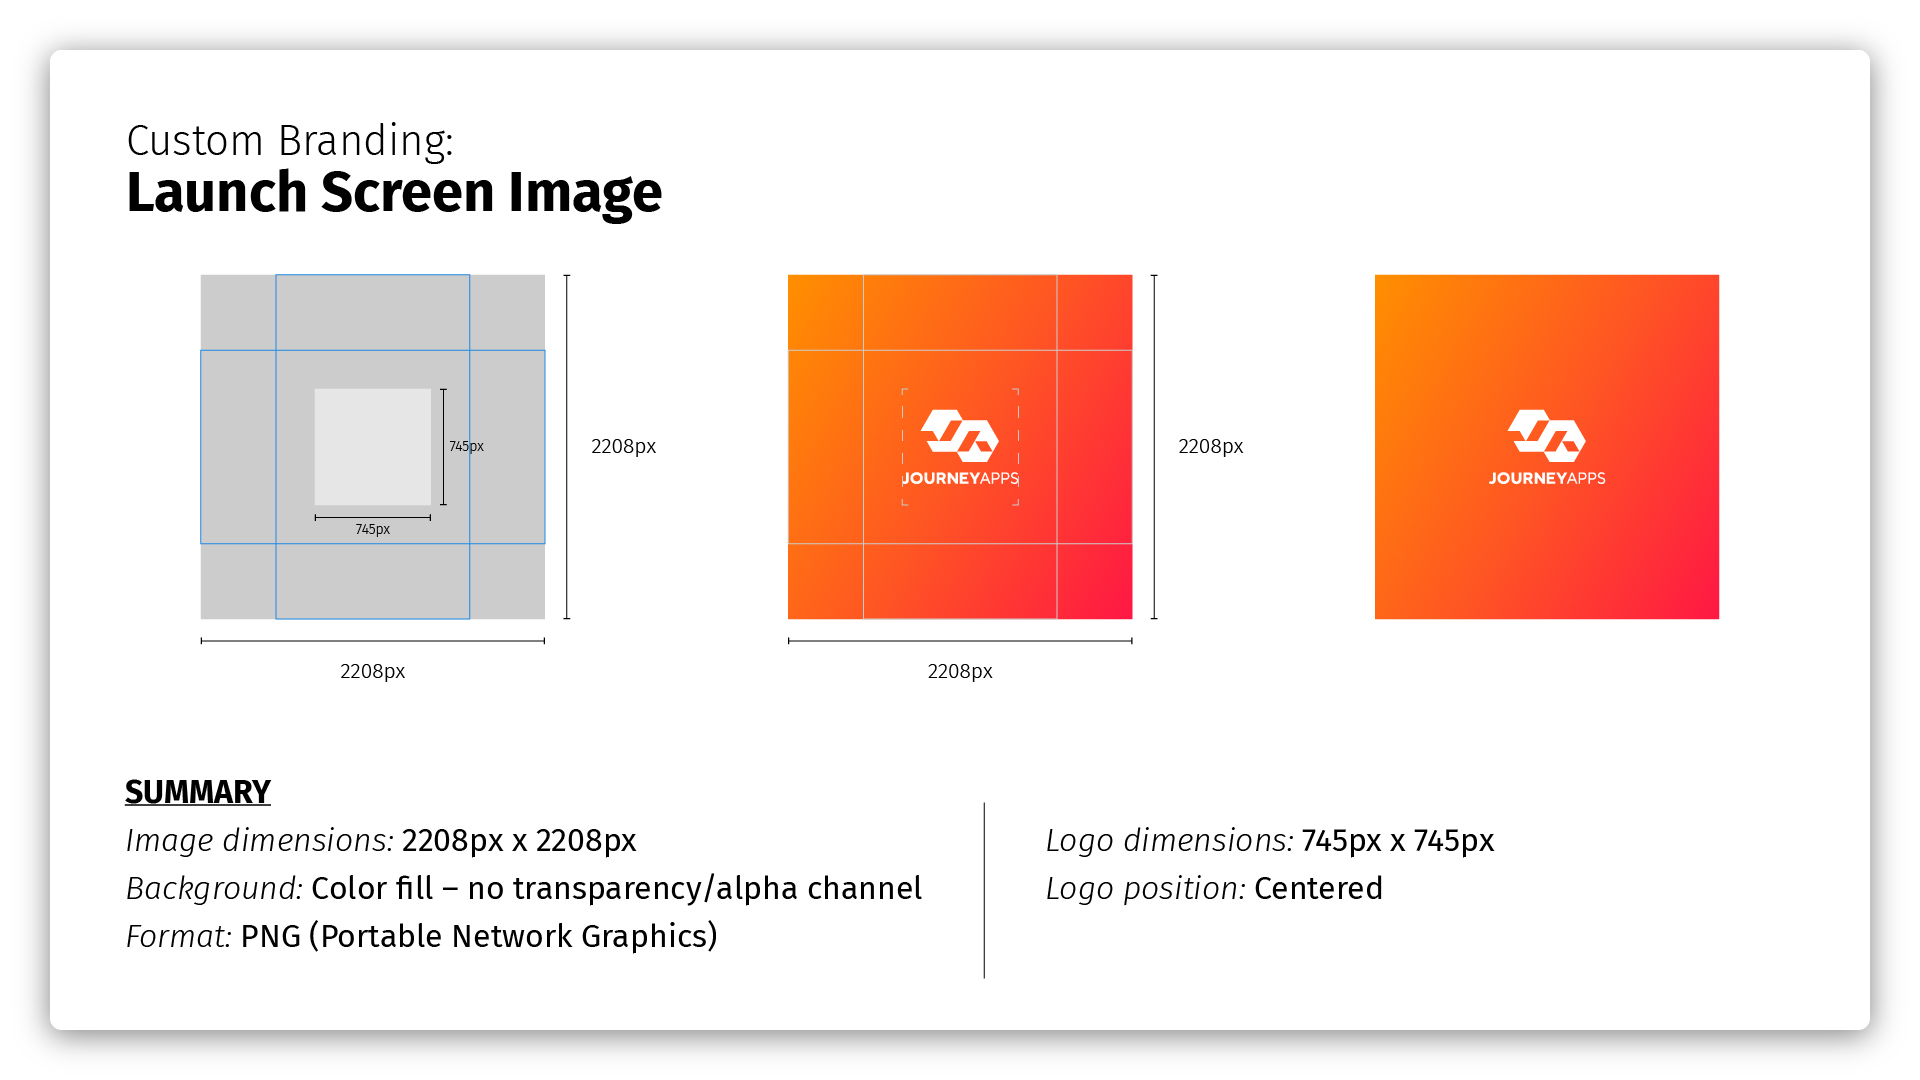
#### Launch Screen Image
{% hint style="warning" %}
**Android limitation**
As of container version **22.9.1,** Android no longer supports custom launch screen images. This is in accordance with requirements that Android 12 introduced.
The launch screen on Android will show the [container icon](#container-icon) in a centered position, surrounded by a solid background color. The background color should be specified by providing a 2208x2208 pixel image in PNG format containing a solid color.
{% endhint %}
Please see below for the requirements for the launch screen image:
* A 2208x2208 pixel image in PNG format, not exceeding 1MB in size.
* The launch image typically consists of your company’s full logo (and slogan) on a solid color background. The logo is positioned in the center of the image and is ideally 745 pixels wide.
* Please note that the launch screen should have no alpha channel.
## Walkthrough: Create a container for an app
Click the + icon or trigger the Create container configuration action using the command palette.
\
What follows is a wizard through all settings that can be configured for a container:
### General
Configure general settings for the container, including the Bundle ID and automatically creating new container builds when a new container version becomes available.
* **Bundle ID**
* Uniquely identifies the container on a device
* Recommended format is xxxx.xxxx.xxxx, e.g. com.orgname.appname, excluding any special characters since platforms have different requirements (see next point).
* Requirements:
* Android ([reference](https://developer.android.com/studio/build/configure-app-module)):
* It must have at least two segments (one or more periods).
* Each segment must start with a letter.
* All characters must be alphanumeric or an underscore \[a-zA-Z0-9\_].
* May not contain Java Keywords.
* iOS and macOS ([reference](https://developer.apple.com/documentation/bundleresources/information_property_list/cfbundleidentifier#discussion)):
* Must contain only alphanumeric characters (A–Z, a–z, and 0–9), hyphens (-), and periods (.)
* Must match the value in the `application-identifier` value in the provisioning profile if supplied
* Windows:
* Must contain only alphanumeric characters (A–Z, a–z, and 0–9) and periods (.)
* **Auto build new versions**
* This relates to [triggering builds](#trigger-container-builds). If enabled, when a new container version becomes available, a new build will be triggered for all included platforms.
* **Enable new features**
* If enabled, when new [container features](https://docs.journeyapps.com/reference/build/app-styling-and-customizations/custom-branding/custom-container-features) become available, they will automatically be enabled for new builds for supported platforms.
* **Download link identifier**
* Set an identifier for the configuration that is used in a long-lived link to download the latest versions of a container per platform.
* The format of these links is `https://appinstall.xyz/download/[org-name]-[download-link-identifier]/[platform]`
* Example: `https://appinstall.xyz/download/acme-inventory-app/android`
* For more details see the [Download and install a Container](#download-and-install-a-container) section.
### Platforms
Select all platforms that you’d like to create a container for and should share the settings defined in this container configuration. Some additional configuration options are specific to certain platforms - these are displayed when a platform is selected.
{% hint style="warning" %}
Due to restrictions of Google Cloud Platform, the Android platform cannot be reenabled after about 30 days of disabling it. To work around this, a new container configuration must be created.
{% endhint %}
#### Windows & macOS:
* **Enable debug mode**
* When enabled, users can access the [Chrome Developer Console](https://docs.journeyapps.com/reference/get-started/journeyapps-fundamentals/journeyapps-syntax-basics#chrome-developer-console)
#### iOS:
* **Generate unsigned IPA**
* This will skip signing during the build process. If you select this option, you will need to sign the IPA manually before you can install the container.
* A provisioning profile is required if not checked (i.e. generating a signed build).
* **Provisioning profile**
* Upload the provisioning profile that you have created for the container using your Apple developer account. See more details in the [Special Requirements for iOS Containers](https://docs.journeyapps.com/reference/build/app-styling-and-customizations/custom-branding/special-requirements-for-ios-containers) section.
* A general error notification should appear if the provisioning profile is expired (the `ExpirationDate` field in the provisioning profile is examined and compared to the current date).
{% hint style="info" %}
**Upload existing private key into OXIDE**
If your container's provisioning profile was not created using OXIDE's **Create iOS container private key CSR** action (see [this section](https://docs.journeyapps.com/reference/build/app-styling-and-customizations/custom-branding/special-requirements-for-ios-containers#create-a-ios-distribution-certificate) for details), the private key associated with the iOS Distribution certificate which is embedded into the provisional profile needs to be uploaded into OXIDE. Trigger the **Upload iOS Container private key** action to upload it. The private key must be in PEM format.
{% endhint %}
#### Android & RealWear:
* **Enable debug mode**
* When enabled, users can access the [Chrome Developer Console](https://docs.journeyapps.com/reference/get-started/journeyapps-fundamentals/journeyapps-syntax-basics#chrome-developer-console)
* This option is only available in version **23.7.1** or greater of the JourneyApps container
### Features
Enable or disable [container-level features](https://docs.journeyapps.com/reference/build/app-styling-and-customizations/custom-branding/custom-container-features), per platform you have selected in the previous section.
Note that some features are only available for certain platforms, and on some container versions.
For iOS, usage descriptions can also be customized here when a feature that supports these is enabled. See which features support these in the table [here](https://docs.journeyapps.com/reference/build/app-styling-and-customizations/custom-branding/custom-container-features#customizable-container-features).
### Branding
Configure the container name, icon and launch screen image.
* **Container name**
* The name displayed with the container icon (e.g. on your device’s app screen). This is typically your app’s name.
* **Container icon**
* Upload the [container icon](#container-icon)
* Must be a png image with dimensions 1024x1024
* **Launch screen image**
* Upload the [launch screen image](#launch-screen-image)
* Must be a png image with dimensions 2208x2208
### Enrollment
The fields in this section are optional. Link your container to one of your app’s deployments by entering a Company ID, or customize the URL scheme of the container.
* **Company ID**
* Links the container to one of your app’s deployments
* Required for SSO
* When specified, app users will not have to enter the Company ID when signing in with a JourneyApps username and password
* **URL scheme**
* Used when [opening the container](https://docs.journeyapps.com/reference/build/integration/opening-external-links-apps)
* Used by SSO
### Advanced
The fields in this section are optional. Configure advanced settings such as enabling exception domains and a proxy for your container.
* Enable HTTP exception domains
* Allows access to unsecured domains via HTTP
* Exception domains
* List of domains
* Must be a comma-separated list of domains, e.g. “foo.example.com,foo2.example.com”
* Enable HTTP proxy
* Funnel all network traffic through the provided proxy
* Proxy host
* Must be a single valid domain e.g. “sub.example.com”
* Proxy port
* Must be a number e.g. 9000
### SSO
SSO configuration for your container needs to be completed by JourneyApps. Please reach out to [JourneyApps Support](mailto:support@journeyapps.com) to request SSO for your container and include the following details from your container configuration:
* Bundle ID (from the [*General*](#general) section)
* Company ID (from the [*Enrollment*](#enrollment) section)
We will notify you when SSO has been configured. At that point, you can go ahead an trigger builds for the container configuration.
## Trigger Container Builds
Once a container configuration has been finalized, container builds can be triggered. The build process produces the container that can be installed on a supported device.
Trigger the **Create container build** action:

* Select one of your enabled platforms
* Only your enabled platforms for the container configuration will be shown here.
* Select a container version
* A warning will be shown if any of the enabled [container features](#features) are not supported in the selected container version.
**Note**: The build process for a container can take a while (typically around 10 or 20 minutes).
The Builds section will list all build processes and includes the build status: in progress, completed, or failed.
## Download and install a Container
After a build succeeds, shareable links to download and install the container will become available.
### Long-lived links
Developers can configure a long-lived link that can be used to download the latest build per platform in a configuration by specifying a *Download link identifier*. See the [*General*](#general) section. Once an identifier for the link has been set, and a build is available, the latest build can be downloaded by clicking on the corresponding platform pill (or right-click to copy a shareable link):
### Build-specific links
Containers can also be downloaded for a specific build. Click on the build artifact button to download it, or right-click to copy a shareable link (note: these links expire within 7 days):
## Troubleshooting
The container configuration wizard contains several validations to minimize issues during the build process.
That said, if a build fails, our support team will be able to review its build logs to assist with troubleshooting. Please contact [JourneyApps Support](mailto:support@journeyapps.com) and include the following information:
1. Link to the app where the container was created
2. The build ID. This can be copied from the build summary by hovering over the ID field: